
DERMAFLAGE SUPPORT CENTER

Instructional Videos
TOPICAL FILLER VIDEOS
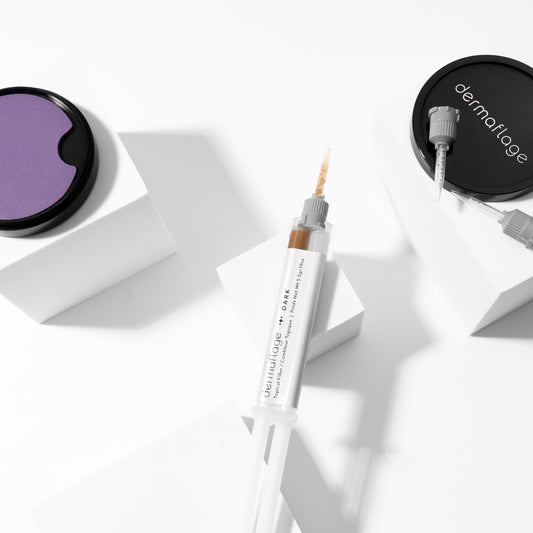
Hey There! Thanks for checking out these tutorial videos. The Dermaflage Starter Kit includes all you will need to get started with our topical concealer.
The tinted Silicone Filler must be mixed and the Texture Pad must be applied for the product to work. The Extended Wear Primer is no longer required, but it can be added to any kit to increase the wear time to more than 12 hours.
APPLICATION QUESTIONS
What do I do if the Dermaflage is peeling?
Make sure that your skin is completely clean- free of moisturizers, skincare products and makeup.
If you have oily skin, you may need the Extended Wear Primer. Make sure you use the primer all around the area- not just the scar or wrinkle itself. A little bit of Dermaflage spreads out more than you think and you want to make sure that the primer reaches all of the edges to hold them down.
What do I do if the Dermaflage looks raised?
Try using less Dermaflage- use just enough to fill the recession and then smooth out the edges with your fingers (do not dab or pat, you do not want to put any texture into the Dermaflage).
Dermaflage is buildable so if you didn’t use enough the first time, you can just add another layer.
Experiment with the two application techniques: 1. with mixing tips 2. mixing the two chambers yourself and using the precision application tool.
What do I do if it looks shiny?
Make sure you are getting the pad on the Dermaflage before it begins to harden. The pad impresses texture into the silicone to make it look like real skin with fine lines and pores.
Make sure you tap all around the pad with moderate pressure (not too hard or you’ll push the product out of the recessed area!)
Don’t take it off too soon! If you remove the pad too soon it will not have a good matte finish- wait the full 2 minutes and then peel back slowly.
What happens if the color is off?
We have a FREE color exchange for 1st time customers! Just email us at info@dermaflage.com and let us know if you need to go a shade lighter or darker.
Unfortunately, we cannot offer a full color exchange for international customers because of the shipping expense. However, if you email us at info@dermaflage.com we’ll send you a 50% discount code.
What happens if it hardens too fast?
Once you apply the silicone, you have about 20 seconds to use your finger to gently smooth the material into the scar or frown line before using the pad. You’ll get better with practice but until then, you can put your applicator in the refrigerator for about 10 minutes before you use it if you want more time to work with it. In warmer conditions it will set-up faster and likewise, it slows down when it’s cooler.
How do I know when it's ready?
It takes a full 2 minutes for the silicone to fully cure. If you use the mixing tip, check the end- when the left over material is solid, it’s ready.
If the silicone sticks to the pad when you peel it back, the product has not yet dried and you’ll need to start again. Also, be sure that the area where you intend to use the Dermaflage is clean, dry and does not have any moisturizer- the silicone will not stick to any sort of oil.
How do I wear my makeup & Dermaflage?
- You can apply your makeup as you normally would, just make sure to leave the area you are going to apply the Dermaflage to totally clean. Dermaflage needs a good clean surface to stick to so it’s important that there are no skincare products or makeup on that area.
- Next, you need to make sure that your Dermaflage matches the rest of your foundation so that it blends seamlessly.
- Now you’re ready to apply the Dermaflage to your scar, frown line, or piercing hole. Apply the product and hold your texture pad on for a full two minutes then peel the pad back slowly
It’s best to not use any makeup on top of Dermaflage (no liquid, powder, cream, etc.). Dermaflage is tinted but translucent and allows your natural skin tone to shine through (which is why it looks so life-like on the skin) so putting makeup on top opaques the Dermaflage out and makes it look like a patch on the skin.
If you need to conceal any discoloration before applying Dermaflage- You can use a mineral powder foundation or a silicone based foundation underneath Dermaflage to conceal the discoloration and then apply the Dermaflage on top of that
Why is the silicone sticking to the pad?
- Make sure you start with clean skin with no products applied
- Completely mix equal portions of clear and tinted silicone (the clear is the catalyst that changes the product from liquid to solid)
- Time yourself with a clock so you don’t pull the pad off too early (you need to hold the pad on for a full 2 minutes)
- The pad can pick up traces of other skin care products that inhibit the cure. If there is continued trouble with the silicone sticking to the pad, wash the pad with warm water and let it hang dry before usage.
Why isn't the Dermaflage drying? It's sticky?
For Dermaflage to turn from a tacky liquid to a solid film, the contents of the two chambers must mix evenly. In other words, the colored part will never dry until it mixes with the clear catalyst. If you are using the mixing tip, make sure that both parts are flowing freely and if you are mixing it yourself, make sure that you use equal parts of the colored and clear formulas.
What happens if I can see discoloration through the Dermaflage?
If you need to conceal any discoloration before applying Dermaflage–You can use a mineral powder foundation or a silicone based foundation underneath Dermaflage to conceal the discoloration and then apply the Dermaflage on top of that.
How to use Dermaflage on shallow scars and frown lines
Shallow imperfections require a slightly different technique. It might be useful not to think about “filling” them, but instead “covering them.” Just smooth a small dab (a little smaller than a pea) over the entire area in one smooth stroke and then put the texture pad on immediately. If needed, you can always add another layer on top in the same fashion. As long as the edges of the Dermaflage are spread thin, they will blend in with the surrounding skin… if the edges are too thick you will get a raised or blob effect. Use a very small dab spread very thin, to the point where it seems like it’s not going to do anything! A lot of people get caught up trying to fill the scar and fool around with it too much, trying to get it just right… that’s when it starts to firm up and becomes a sticky mess.
QUESTIONS ABOUT THE KIT
How do I store it when its not being used, will it dry out?
- We recommend storing the applicator with either the gray cap on or a mixing tip when not in use. This will keep it from attracting dust or lint.
- In order for the Dermaflage to turn from a liquid to a solid, the two parts must mix. The product itself will not dry out but you should be careful to wipe the hole of each chamber clean after use before replacing the gray cap or a mixing tip. If there is mixed residue after use it will solidify and plug the applicator. If this happens, just use a narrow pointed object like a tooth pick to remove the plug.
Do I have to use the mixing tips?
- No! But we do recommend that you try them to see which application technique you prefer.
- Some people like them because they mix evenly and are less mess. Many claim that they are the key element to their successful application technique. However, others don’t like the waste so it’s really up to you!
Can the mixing tip be used multiple times?
Unfortunately, the mixing tips are single-use and disposable. The product mixes inside the tip and turns into a solid that can’t be removed. We are always working on improving the design elements and this is the best solution we have at the moment.
Do I have to use the primer?
No, the primer is not necessary to wear Dermaflage. However if you have oily skin or you would like to wear your Dermaflage for a longer period of time you may want to consider buying the Extended Wear Primer.
How do I clean off the pad?
Just wash it with water and antibacterial soap and let it air dry so it doesn’t pick up an fibers from a towel.
How do I use the tools?
However you want to! However, most people use the long mixing stick to mix together the two parts and apply a larger amount to the face. The pick tool is great for applying a very small amount.
QUICK TIPS/FACTS
Mixing Tips are Single Use
In order for Dermaflage to go from liquid to solid, the two chambers of the applicators must mix. The tips are a great application tool but they can only be used once because the product hardens in the tip.
Clean Skin
Make sure you do not have any moisturizer or skin care products in the area that the Dermaflage will go- the oils inhibit its ability to stick. To be sure, you can clean the area with a skin toner before applying the Dermaflage.
You can cut the pad!
You can cut the texture pad into whatever shape works best for you!
Don't use the primer when practicing
If you are just getting started with Dermaflage you will most likely need to practice your application technique a couple of times before you get it perfect. We suggest NOT using the primer while practicing because the primer makes it stick really, really well! Peeling on and off several times in a row can be like ripping off a bandaid.
